Shop by Category
Shop Collagen
Get clinically proven results for your hair, skin, nails, joints and gut with collagen. Packed with powerful ingredients and offered in versatile powders, capsules or gummies.

Shop Sports Nutrition
Whether you’re looking for effective and natural hydration†, a clean energy boost†, fat loss support†* or gut-friendly protein, we’ve got the right formula for you. Who says supplements are just for athletes?
Peptides are small but mighty. These bioactive messengers are easily absorbed and work with your body, delivering targeted activity for specific benefits that range from appetite control to metabolism support.
Shop Organic SuperGreens
From clean energy and detox and digestion support to gut health and whole-body balance – our Organic SuperGreens products give you the benefits of juicing without the hassle.
Shop Protein
Discover superfood protein powders with easy-to-digest ingredients, designed to help you support your metabolism, build lean muscle and be greater than your goals.
Shop Gut Health
Put your gut health first. Our powerful probiotics, enzymes and supplements are designed to promote gut health and comfort, healthy digestive function and immune system support.
Shop Vitamins & Minerals
Designed to fill the gaps left by modern diets, our superfood formulas combine ancient techniques like fermentation with clinically proven ingredients for results you can really feel.
Our Story
Ancient Nutrition is driven by our mission to bring history’s most powerful superfoods to the world with a steadfast commitment to restoring our farmlands and healing our planet through regenerative farming.
Here's 10$ off from your friend
Discount code copied!
* This offer expires in 3 days
Home/Blog/4 Yoga Poses to Get Your Food Cravings Under Control
4 Yoga Poses to Get Your Food Cravings Under Control
By Leah Zerbe
April 20, 2021
There are many reasons we reach for a bag of chips or carton of ice cream when we’re really not physically hungry. Maybe we are craving love, conversation or good company. Maybe we are feeding our inner stress monster after working a 70-hour week. Maybe we’re distracting ourselves from an old emotional wound that we haven’t yet faced.
Whatever the case, I want you to know that food cravings often have deeper meanings. And one way to cut through the distractions and develop compassion for yourself is to cultivate more mindfulness in your life.
Yoga is a science-backed way of doing just that.
Here are a series of four gentle poses that will help nurture your nervous system and help bring your scattered thoughts back to home base by connecting with your breath. These poses aren’t considered vigorous, but research shows that even restorative yoga postures help us burn excess fat, including that belly fat that seems to accumulate when stress and cravings are at an all-time high. That’s because we’re working with the nervous system to stop the overflow of stress hormones in your body.
The next time you’re experiencing food cravings, take a few minutes to explore these poses.
1. Crocodile Pose
This is the opening posture in almost every class I teach. Why? Because it physically allows students to turn their backs on all of the stressors of the world for a few minutes.
But it’s so much more than that. The gentle lift of the chest in this gentle posture naturally positions the body for easier diaphragmatic breathing. Without inviting this corrective breathing into our yoga practice, we’re missing out on a huge opportunity to cultivate a better nervous system balance. After all, diaphragmatic breathing is necessary for the parasympathetic nervous system to produce a calming effect.
Don’t worry if it takes awhile to relax into this posture. Although more restorative, it still may take some practice. With time, and practice, you’re aiming to build a breath that is:
Smooth and with inhales and exhales through the nostrils
Continuous and without pause at the top or bottom of each breath
Quiet and deep without effort
Inhalations and exhalations about the same length
Let’s get set up for crocodile …
Lie face down on a firm surface.
Stack your forearms on top of one another, with each hand on the opposite elbow.
Draw the forearms in so that the chest is slightly off the floor, with the forehead resting on crossed arms. If this creates tension in your shoulders, slide your elbows out a little wider.
Slightly separate the legs a comfortable distance with the toes turned in, out or back, whatever feels best in your own unique body.
Close your eyes. Relax the legs, abdomen and shoulders. Soften the eyes and jaw. Turn your attention to the breath. Feel the cleansing qualities of each exhalation and the rejuvenating effects of each inhalation.
Center here for as little as 15 breaths or up to 5 minutes.
If your mind starts to wander, bring it back to the breath and enjoy this experience of being in your body in a more mindful way.
2. Supported Bridge with Optional Ujjaii Breath
Merge your breath and awareness and gently activate some of your body’s most powerful prime mover muscles in this supported posture. Be sure to have a yoga block, folded blanket or bolster nearby.
Lie on your back with bent knees, feet flat on the floor and hip-width apart.
Knees should be over your feet.
Press through your heels and gently lift your buttocks off of the floor.
Slip a yoga block, folded blanket or bolster under your sacral area and place your weight back down on it. (If it’s in the curve of your low back, it’s too high.)
Place your arms in a resting position that is comfortable. To open a bit more across tight chest muscles, place your hands along your sides with your palms facing up, tucking your shoulder blades underneath you.
Breathe here in supported bridge for 2 to 3 minutes to promote relaxation, reduce tension in the neck and shoulders and support digestion.
When you are finished, press through the heels, lift your buttocks off of your support, remove your block, blanket or bolster and return back to the floor.
You may feel a focus on your throat while resting in supported bridge. If you’re experiencing that, it could be a welcome time to add in Ujjaii breath, also known as “victorious breath.” This breathwork is shown to create a calming sensation in the mind while reeling in your “fight-flight-or-freeze” center in the sympathetic nervous system.
Ujjaii breath helps stimulate the vagus nerve, which connects your brain and your gut and induces a parasympathetic nervous system response.
To practice this breathing, stay in supported bridge and …
Close your mouth, breathing in and out of your nostrils.
Notice a slight constriction in the throat area from being in bridge pose, and try to breathe in and out of this space in the back of the throat.
On the exhale, think about how you would breathe if you were fogging up a mirror or glasses, but do so with your mouth closed. You may sound a bit like Darth Vader. That’s a good thing.
On the inhale, keep the mouth closed and take that “Darth Vader” breath in to the back of the throat.
This is also referred to as “ocean breath,” so think of that breath rolling in and out of the back of the throat like a series of waves.
If you aren’t getting the hand of it right away, don’t stress. Ujjaii breath often takes some practice. But the rewards are worth it.
3. Reclining Bound Angle Pose
It’s no secret we hold a lot of stress in our neck and shoulders. But our hips hold a lot of tension, too. For this one, I recommend using a towel to make sure the hips aren’t overstretching and hanging in space.
Sit on the floor and bend your knees, placing your feet on the floor.
Grab a towel and place one end under your left buttocks.
Take the towel and wrap it around the front of your left then right ankle.
Lift your right buttocks and place the other end of the towel under it, pinning it down.
Gentle lie back onto your back and slowly let your knees fall open, bringing the bottoms of your feet together.
Rest your arms along your sides with the palms facing up and breathe diaphragmatically as gravity helps open up tight adductor muscles in the inner thighs.
Breathing here, think about your belly rising and ribs expanding on each inhale, and relaxing through the abdomen on each exhale.
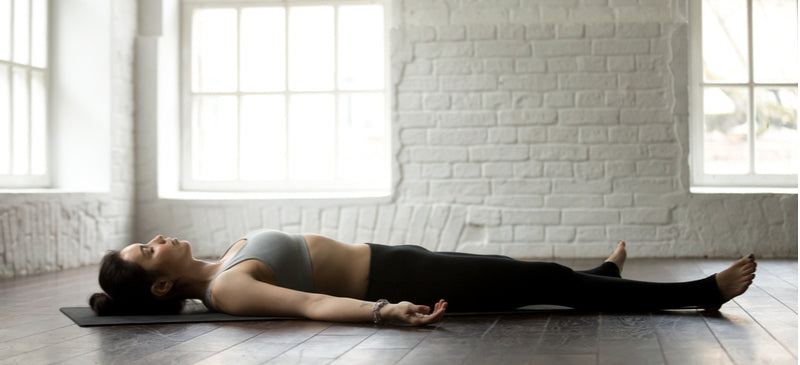
4. Corpse Pose
While it may be tempting to skip this last one, stick with it. Even a brief, five-minute relaxation in corpse pose helps integrate all of the restorative work you’ve done leading up to this.
Lie flat on your back with your legs long and your arms along your sides, palms up.
Gently draw your shoulder blades underneath you and close your eyes.
Continue following the flow of your breath, noticing the cool sensation of the breath as it hits the edge of your nostrils on each inhale, and the soft warmth that catches the edge of your nose on each exhale.
Rest here for several minutes, letting the benefits of your practice take hold.
With a B.A. in journalism from Temple University and a M.S. in exercise science from California University of Pennsylvania, Leah Zerbe covers health news and functional fitness topics. She’s also a certified personal trainer and corrective exercise specialist through the National Academy of Sports Medicine and is a certified yoga teacher through Yoga Alliance. Leah resides on her family’s organic farm in Pennsylvania.
Related Articles
August 1, 2025
|recipes
Chocolate Chia Seed Pudding: High in Protein and Fiber
A chia seed pudding is one of those healthy snacks that many of us, truth be told, have yet to make. Perhaps a chocolate version will convince you to give it a try? It’s worth it!
May 21, 2024
|recipes
Eggless Strawberry Ice Cream
Strawberries make a great flavor for so many desserts, such as strawberry shortcake. But for many, strawberry ice cream is where it’s at, for it's one of the most popular summer dessert recipes.
April 4, 2024
10 Edible Flowers: How to Use and Their Health Benefits
Edible flowers? Springtime is when flowers make their way onto the dining table as decoration, but as food? While we’re not talking about a flower sandwich or smoothie, many flowers do work well as flavor enhancers and as a colorful garnish — plus, most importantly, they may also contain some health benefits.
July 25, 2026
|health
What Are Methylated Vitamins? Potential Benefits Plus Multivitamin Options with Them
If you’ve ever scanned the supplement aisle, you may have noticed the term methylated vitamins or even a methylated multivitamin on labels. These aren’t just marketing buzzwords: Methylated forms of nutrients may play an important role in how your body absorbs and uses vitamins, especially B vitamins.

- © 2010-26 Ancient Brands, LLC. All rights reserved.
- Terms of Use
- Privacy Policy
- CPRA Privacy Policy/Notice of Collection
- Do Not Sell or Share My Personal Information
- Consumer Health Data Privacy Policy